Gluten-free and Egg-free Recipes (with some Dairy-free options)

Archive for the ‘Scones and Loaves’ Category

Pancakes – Gluten-free and Vegan

IMAG0063

Yes, I have posted about pancakes before. The buckwheat recipe I posted recently is still a favourite here, however, I wanted to revisit the recipe I posted a little while back for regular pancakes (pikelets). When I visited the UK in 2016 I realised that the Orgran No Egg egg replacement powder is not as readily available as it is here in Australia so I wanted to see if I could make pancakes with another substitute. I’m going to try applesauce at some stage as a substitute but I know that mashed banana is also used as an egg replacement. I tried it yesterday and it worked fine. All of the other ingredients are the same as in the original recipe but I’ve re-posted it here for convenience. There is also a flax egg alternative if you don’t have or can’t eat bananas.

Ingredients

300 g gluten-free self raising flour

1/2 teaspoon bicarbonate of soda (baking soda)

1 mashed well ripened banana (medium size)* see flax alternative below

350 ml milk of choice (rice/coconut milk for dairy-free or regular milk if not dairy-free)

2 teaspoons white vinegar

20 g melted Nuttelex (or other dairy-free margarine, or butter if not dairy-free)

Method

  1. Sift all of the dry ingredients together.
  2. Mix the vinegar and melted Nuttelex with the milk and mashed banana and add to the dry ingredients.
  3. Use electric mixers to mix well.
  4. Heat a non-stick frypan, pancake maker or pie maker and spray with olive oil.
  5. Add spoonfuls of the mixture and allow to cook until bubbles form at the surface then flip over to cook on the other side.
  6. Allow to sit in a stack on a plate for 5-10 minutes before eating (this allows the inside to cook further – otherwise it can be a little doughy on the inside).

Bellini instructions:

  1. Add the Nuttelex/butter to the Bellini bowl and mix speed 1, 60 C for 3 minutes or until melted.
  2. Add the milk, banana and vinegar to the bowl.
  3. Add the flour then the bicarb. soda on top.
  4. Mix at speed 6 for 10 seconds. Scrape down and repeat if needed.

Tip: You may need to add a little more milk to the mix depending on which milk you use. For coconut milk, I find it needs a little more than with rice or dairy milk. If the mix doesn’t drop onto the frypan easily, add a tablespoon (20 g) at a time and mix until it looks right.

I cook mine using a Kambrook Pancake maker and use 1/4 cup of mixture. I preheat the maker then open up and spray with olive oil. I then add the mixture into the deep side and leave the maker open and allow it to cook. When the bubbles start breaking on the top, I close the lid and flip them over to the other side of the maker. I then open it up and spray the deep holes and add more mix while the first two are cooking on the other side. The instructions tell you to close the lid but I find that this compresses the pancakes and makes them doughy inside.

*An alternative to the banana is to use 6 teaspoons of flax meal and 80 g of hot water. Mix together and allow to gel for 10 minutes before using in the mixture.


Doughnut Muffins – Gluten-free and Vegan

IMAG0049

A couple of years back on a Facebook thermocooker page this recipe for doughnut muffins went viral with everyone cooking them up. They are very yummy but the good news is that they can be made gluten-free and vegan easily. I’ve modified the recipe and upsized it to make 12-14 muffins which suits our household. You also don’t need a thermocooker to make them. I’ve used apple puree/applesauce to replace the egg, but No Egg replacement powder also works well. I have also used coconut milk for the milk. I think they would taste lovely with some chopped apple in them so that might be a future try. Eaten warm, these are fantastic. If you have any leftover, just freeze and reheat in the microwave and they will still taste good. Here’s the recipe:

Ingredients

300 g gluten free plain flour

2 1/4 teaspoons baking powder (make sure it’s gluten-free)

1/2 teaspoon salt

1 teaspoon cinnamon

1/2 teaspoon nutmeg

240 g caster sugar

360 g rice milk (or coconut milk or dairy milk if you can have it)

100 g light flavoured oil (I use sunflower or canola)

60 g applesauce/apple puree (or you could use 60 g water + 1 1/2 teaspoons of Orgran No Egg powder)

Topping: Approximately 30 g of melted Nuttelex (or other dairy-free margarine) or butter (if not vegan and can have dairy), cinnamon sugar (I never measure this, I just add a couple of tablespoons of sugar to a bowl and stir through a teaspoon of cinnamon and add more of less of each until it looks right)

Method

  1. Add all dry ingredients to a bowl (or thermocooker) and mix well. In a thermocooker press pulse a couple of times to mix.
  2. Add the wet ingredients and mix well with beaters or on a thermocooker use speed 6, 10 seconds and then scrape down the bowl and then speed 6, 6 seconds.
  3. Cook in muffin tins at 160 C (fan-forced oven) or 180 C (conventional oven) for approximately 20-25 minutes or until a skewer inserted in the centre comes out clean. The mix makes 12-14 muffins.
  4. After a few minutes tip the muffins out of the tins. Dip or brush the tops with melted Nuttelex and sprinkle with cinnamon sugar. I put the cinnamon sugar into a shaker and shake on top.


Buckwheat Pancakes – Gluten-free, Egg-free, plus Dairy-free and Vegan option

IMG_0809

A friend gave me a recipe for these buckwheat pancakes (thank you V!) and I’ve adjusted them to be egg-free. They contain dairy. I’ve only just tried the recipe last night so I haven’t had a chance to see if they will work well with dairy substitutions but I’ve suggested some to try in the ingredients list. Update: I’ve now made these dairy free according to the instructions below and they taste just as good. This recipe made a huge stack. We were eating them after dinner so ended up giving a pile to our neighbours who told me they were ‘da bomb’. I still had a couple left over and I’ve just eaten one with my morning coffee. Unlike other recipes where I toss any not eaten (which is rare), these pancakes actually taste nice the next day just left on the bench overnight. My neighbours want the recipe so without further ado here it is:

Ingredients

320 g buckwheat flour

500 ml buttermilk (for dairy free use 500 ml coconut milk and 40 ml of apple cider vinegar)

80 g brown sugar (you could reduce this if it’s too sweet)

1 teaspoon salt

2 teaspoons gluten-free baking powder

1 teaspoon baking soda (bicarbonate of soda)

1/2 teaspoon cinnamon

1/4 teaspoon nutmeg

60 g melted butter (a dairy free margarine for dairy-free eg. Nuttelex)

60 g applesauce

Egg-replacer for 2 eggs – If using Orgran No Egg* (I think there is a similar EnerG in the USA) use 2 heaped teaspoons of No Egg powder and 80 ml of water. Last night I used a new egg replacer from a company called ‘Yes You Can’. It’s called ‘Vegan Egg Replacer with Organic Chia’. It is available in India, the Philippines and New Zealand according to the packet. For this I used 2 tablespoons of the powder and 120 g of water. If you can eat eggs you can just use 2 eggs.

Method

  1. Stir together the flour and buttermilk (or coconut milk and vinegar), cover and leave to sit at room temperature for at least 6 hours (that’s the time I left it). It is winter here so it was sitting at around 19 C on the bench for that time.
  2. Add everything else and mix well (I used electric beaters).
  3. Cook on a well greased pan until bubbles form then flip and cook the other side. I used an electric pancake maker.
  4. Serve with maple syrup or topping of choice.

Some tips: Ensure that the pan or pancake maker is well greased. I used an olive oil spray but was sure to put plenty on.

*In Australia, Orgran No Egg powder is available at most Coles stores and some health stores. I’ve also seen it in Woolworths recently. In the UK, I was able to get it from a Holland and Barrett health store.


Eggless and Gluten-free Brazilian Cheese Bread

img_1286

img_1287

A recipe for Brazilian Cheese Puffs came up in my email box this week and it reminded me that I modified a similar recipe to make it eggless a couple of years ago. On Friday I thought I’d give it a whirl again though I made a few more tweaks to get it right. I have only made this eggless and gluten-free, but if you use vegan cheese and rice milk, I imagine it would work fine.  The original recipes did not have baking powder in them, but with replacing the egg I find it needs the baking powder. These are great as little nibbly things. When I commented on them on a cooking group, I was told that they are often eaten with caramel. This seems a strange idea to me, but I might try it one day.

Ingredients

70 g grated parmesan cheese

200 g milk

60 g oil (I used sunflower)

1 heaped teaspoon Orgran No Egg powder (or use EnerG)

2 teaspoons gluten-free baking powder

170 g tapioca starch (My friends who have lived in South America tell me that potato starch is sometimes used instead.)

1 teaspoon salt

Method

  1. Preheat a fan-forced oven to 200 C (or 220 C for non-fan forced). It needs to be a hot oven.
  2. Place everything into a blender or thermocooker and blend until mixed well. On my Bellini I use speed 8 for about 10 seconds, scrape down the sides and then speed 8 for 5 seconds.
  3. Place tablespoons full (4 teaspoon tablespoon) into greased mini-muffin tins and bake in the oven for about 12 minutes. Watch carefully as it’s easy to overdo it.

Gluten-free and Egg-free Spinach Scones (Low lactose version too)

spinach scones

I’ve been meaning to do a blog post about these for some time. My friend’s daughter is both gluten and lactose intolerant and these scones can be adjusted to make them low lactose. She has been asking for the recipe so here goes:

Ingredients

300 g gluten-free self raising flour (I use the Aldi or Orgran brand)

1 teaspoon GF baking powder

80 g butter (chopped into cubes – butter contains very little lactose)

200 g feta cheese, in cubes (feta cheese has a small amount of lactose – 0.5 g per 100 g product)

100 g fresh baby spinach leaves

190 ml milk (for the low lactose version, use a low lactose dairy milk, or use rice milk)

A little extra flour

Method

  1. Preheat the oven to 200 C/390 F (fan-forced) or 220 C/430 F (conventional)
  2. Place the flour, baking powder, butter, cheese and spinach into a food processor or thermocooker (I use the Bellini Intelli Kitchen Master).
  3. Press pulse on the machine until the butter, spinach and cheese is incorporated into the flour.
  4. Add the milk and pulse in short bursts until the mixture has just come together.
  5. Turn onto a floured board and roughly pat out. The mixture will be very moist.
  6. Cut into about 12 squares with a knife and place on an oven proof tray.
  7. Bake  for 15-20 minutes or until golden.
  8. If you don’t eat all of these in one sitting, freeze the remains and re-heat using a microwave when needed. They do not keep well on the bench overnight.
  9. If you don’t like feta cheese, different types of cheese should work fine.


Gluten, dairy, and egg-free vegan bread

IMG_1146 (more…)

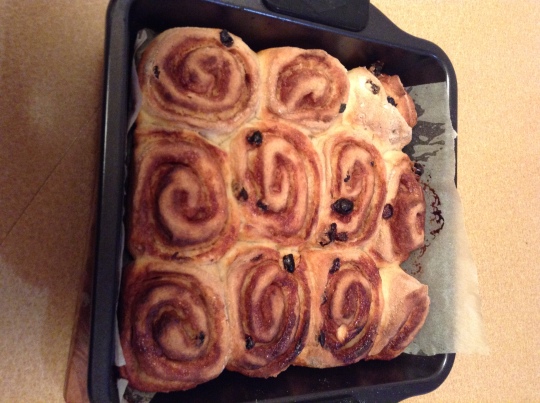
Gluten-free, Dairy-free and Egg-free Coffee Cinnamon Scrolls


coffee scrolls

One of things that most people with coeliac disease or gluten-sensitivity miss is bread. Maybe when I retire I’ll be able to spend time trying to  find a recipe that works.  I don’t know about you, but I’ve eaten an awful lot of commercially available gluten-free bread that just tastes horrible. A lot of them contain eggs, so I can’t eat them anyway. One brand I do like is Schar, and another egg-free brand I don’t mind is Zehnder. I’ve also tried most of the mixes that don’t need eggs and I can’t say I really like any of them, with one exception. Last year a friend told me about the F G Roberts Cottage Bread Mix and yum, finally there is a gluten-free bread that tastes ‘normal’.  It is dairy-free and egg-free but it does contain soy flour. I’m sorry for the non-Australian readers who have no access to it, but here’s some more infomation for fellow Aussies as to where to purchase it. I decided to have a go at making some cinnamon scrolls with this mix and have to say that they are way too yummy for my waistline!

The bread mix uses yeast. One thing to be careful of is the temperature of the water. Yeast only needs a lukewarm temperature and will die at high temperatures. A lot of people make the mistake of having the water too hot for the yeast. Another tip is with the proving of the bread. I have a double oven. The bottom oven is fan-forced and the top oven is a conventional oven. To prove the bread I put a bowl of boiling water on the bottom of the conventional oven and put the tray on the shelf and close the door.  Here’s the recipe:

Ingredients

380 ml warm water

330 g F G Roberts Cottage bread mix

5 g dry yeast (I use Lowan)

6 ml vegetable oil

6 ml white vinegar

handful of sultanas or mixed fruit (optional)

60 g butter (for dairy-free use Nuttelex or another dairy-free margarine)

60 g brown sugar

2 teaspoons ground cinnamon

Walnuts or other nuts (optional)

Icing: 140 g GF icing mixture, 20 ml hot water, 1 teaspoon instant coffee

Method

1. Place the water into a mixing bowl and sprinkle the yeast across the top. Add the vinegar and oil and mix with a fork until the yeast is dissolved.

2. Add the bread mix and the sultanas and mix together with a spoon.

3. Lightly flour a large board with rice flour or other gluten-free flour and lightly knead the bread until it comes together smoothly. Roll out until it is a large rectange.

4. Mix the soft butter, cinnamon and brown sugar together and spread across the bread dough. Sprinkle with walnuts if using.

5. Roll up the rectangle and cut the log into 3 cm pieces.

6. Place the pieces evenly into a round or square cake tin. I used a 23 cm square tin lined with baking paper.

7. Allow to rise in a warm place for about 45 minutes (see directions above).

8. Bake at 200 C fan-forced  (210 C/410 F conventional) oven for approximately 25-30 minutes.

9. Allow to cool before icing. For leftovers, freeze without icing and reheat using a microwave.

10. Ice with coffee icing. For the icing, combine the hot water and the coffee. Pour only enough of the coffee mixture into the icing sugar to make a smooth icing (you may not need it all).

Gluten-free, Egg-free and Dairy-free Pikelets (Pancakes)

Image

I haven’t blogged for ages. It’s not because I haven’t been experimenting with food, I just haven’t had the time to blog about it! Sooo many recipes to try yet so little time!

For ages I’ve been trying to find or create a great gluten-free and egg-free pikelet recipe. If you’re reading this in the USA, you probably are wondering what pikelets are. In the USA you would call them pancakes, but to me pancakes are just thick crepes that you can roll up and eat with lemon and brown sugar. I’ve also been trying to find a good crepe recipe too. The good news is that I’ve had success on both fronts (crepe recipe to come soon).

A lot of the hassle was because I’ve found that the normal gluten-free flours I’m used to using just don’t work well with pikelets or crepes. I’m not sure why, but found that whenever I put the mixture into the frypan, the pikelets would just sit there as a blob and get burnt on the outside without really cooking in the middle. There are some ready-made mixes out there, but many of them have egg powder in them.

The solution is to use a gluten-free flour that contains soy flour. At the Gluten-Free Show in Brisbane this year Melinda from Melinda’s Gluten Free Goodies gave me a free sample of her new gluten-free flour to try. It works a treat with the pikelets. Initially I made the recipe gluten and egg-free, but today also made them gluten, egg and dairy-free in recognition of those who are lactose intolerant or dairy allergic. Here’s the recipe:

Ingredients

150 g (1 metric cup) Melinda’s Gluten-Free Self Raising Flour*

1/4 teaspoon bicarbonate of soda (baking soda)

40 g (2 tablespoons) caster sugar

5 g (1 teaspoon) Orgran No Egg powder** – if you can eat eggs use 1 egg and reduce the milk volume to 135 ml milk

175 ml milk (for dairy-free use 175 ml of rice milk)

1 teaspoon vinegar

10 g melted butter (for dairy-free use 15 g of Nuttelex***)

Method

1. Sift all of the dry ingredients together.

2. Mix the vinegar and melted butter (Nuttelex) with the milk and add to the dry ingredients.

3. Mix well with a wooden spoon until there are no lumps.

4. Heat a frypan with some butter or Nuttelex until hot. Add spoonfuls of the pikelet mixture. Allow to cook until bubbles form at the surface then flip over to cook the other side.

5. Serve with whatever you like. One of my sons loves them with maple syrup.

Today I made a batch with dairy milk and a batch with the rice milk. I asked my husband to try them to see if he could detect any difference. He said the dairy-free ones were slightly saltier than the dairy ones but otherwise tasted fine.

Tips

1. If the pikelet mixture sits for a while it can thicken. Use a little milk to get it to the right dropping consistency.

2. When using the dairy-free version I found that the mixture did not spread quite as well in the pan so when I flipped them some of the middle came out the sides. Just turn them over quickly again at the end and press down with the spatula to cook these bits. Another trick is to put the lid on when cooking as this helps to cook the inside at the same time as the outside.

Notes on ingredients

*Melinda’s flour isn’t readily available everywhere yet so if you can’t get it use a gluten-free flour that contains soy flour such as the F G Roberts brand. Note that it’s self-raising flour, so if using a plain flour containing soy flour then add 2 teaspoons of gluten-free baking powder.

**Orgran No Egg is available in Coles and IGA supermarkets in Australia. I’ve seen people blog about using it in the USA. I also understand there is a different brand of egg replacer in the USA.

***Nuttelex is a dairy-free margarine/butter substitute

Pumpkin Scones Gluten-free Egg-free

While on the theme of scones I thought that I would have to publish my pumpkin scone recipe. In Australia, whenever you mention pumpkin scones, people seem to automatically think of Lady Flo Bjelke-Petersen  and her famous pumpkin scones. Lady Flo is a former federal senator for Queensland and wife of Sir Joh Bjelke-Petersen who was Premier of Queensland for many years. We lived in Kingaroy for over four years when my husband was teaching and the Bjelke-Petersen property was not far from the town. I met Lady Flo and her daughter when I went to see the movie “Emma” at the local cinema and found them to be very pleasant people.

Although I own Lady Flo’s cookbook, my pumpkin scone recipe is a little different in its ratios. It was given to me by a friend from church while we lived in Kingaroy and I’ve always loved the results. I haven’t cooked it for years and now that I need to exclude gluten and eggs I thought I  would give it a try. The recipe is potentially dairy-free if you use a non-dairy butter/margarine. I use margarine instead of butter as I prefer the softer texture it gives. The recipe requires an egg, which is a pain, but I use an egg-replacer and it does the trick. Apologies for the blurry picture, by the time I realised that the picture was blurry the scones were all eaten so I couldnt’ take another pic.

Ingredients

2 cups gluten-free self raising flour

1/4 teaspoon salt

60 grams (approx 2 oz) margarine (use butter or a non-dairy substitute for dairy-free)

60 grams sugar

1 egg equivalent of egg-replacer (I use a brand called “No Egg” made by Orgran and use 1 teaspoon of egg-replacer powder to 2 tablespoons water) If you can tolerate eggs just use one egg.

1 cup mashed pumpkin

1-2 tablespoons milk (if you need it – this time the mix was moist enough without)

Method

1. Preheat the oven to 230 C/450 F and line a baking tray with baking paper.

2. Prepare the pumpkin first. I like to use Jap (Kent) pumpkin as it is usually a lovely colour of orange which is full of flavour. I peel and cut it up into fairly large chunks and boil in water until it is just tender. Be careful not to overboil or the pumpkin ends up watery. I place the pumpkin into a sieve to drain and then mash with a fork. Make sure the pumpkin is cool before making the scones.

3. Cream the butter and sugar.

4. Add the egg replacer and mashed pumpkin and beat well.

5. Using a knife, gradually incorporate the flour to make a light dough. Use the milk if the mix is a little dry or add a little flour if too wet.

6. Place on a well floured board and pat out to roughly a 2 cm thickness. As for the lemonade scones, a slightly more moist dough is better than a dry one.

7. Dip the scone cutter in flour and cut out the scones.

8. Place on the oven tray and brush with milk. Place the scones close together.

8. Cook in the oven  until lightly browned.

Important Tips

1. The pumpkin should be cold before making the scones.

2. Don’t overcook the pumpkin or the dough will be too wet.

3. I keep my flour in the fridge so that I keep the dough cool until it is cooked.

The Verdict

Can we make them gluten and egg-free? Sure can! There were none left over to see if they freeze well.

Scones Gluten Free Egg Free

Masterchef is back on our screens in Australia and this week I noticed that one elimination challenge was to make scones. It always surprises me when an amateur cook says they’ve never made scones. Making scones is such a good technique to have because they can be whipped up quickly when unexpected visitors arrive. Coeliacs and egg allergy sufferers need not miss out on this classic afternoon tea favourite. This recipe uses just three ingredients and works fabulously every time. There is some technique involved which I’ll explain as I go.

Ingredients
3 cups gluten-free self raising flour

1 cup of thickened cream (check it does not contain wheat thickeners)

1 cup of lemonade

Method

Preheat the oven to 230 C/450 F. Line a baking tray with baking paper.

Sift the flour into a largish bowl and make a well in the centre.

Add the cream to the well and then not quite all of the lemonade . I like to keep a little (about 50 ml – 2 oz) aside as sometimes the full cup is too much for the mix.

Using a knife, mix in the wet ingredients. Make sure that you do not overwork the dough, you just want to bring it all together. If you need to, add the remaining lemonade to bring it all together. Don’t worry if it’s a bit sticky. In my experience a little sticky is better than too dry.

Flour a board with a little of the gluten-free flour.

Transfer the dough to the board and pat out until it is about 2 cm thickness (a bit less than an inch). Don’t roll it or knead it.

Using a cutter dipped in flour cut out the scones and place on the baking tray. Make sure the scones are placed next to one another as this helps them to rise. Don’t worry if the cutter gets a little sticky. Again, if the scones are a little sticky they turn out better because with the leftover dough you can push it together and cut again without them getting too dry or overworked.

Brush the tops with a little milk.

Cook in the oven for 12-17 minutes. My oven is not fan-forced and the scones take around 17 minutes to cook. They will be cooked when they are a little browned on the top and underneath.

Tips

Make sure the oven is pre-heated to the correct temperature. Scones need quite a hot oven to cook properly.

Don’t overmix the dough or it will get tough and the scones won’t be light and fluffy.

Don’t worry if they are a little sticky.

My scones usually rise well. Traditionally scones are broken in half but I find that these are so light and fluffy that they don’t hold together so well when broken in half so we just top them whole with cream and jam and eat them like that.

In my house the scones disappear quickly but if there are any leftover make sure you freeze them. These scones do not keep well if not frozen. The next day they are dry and horrible. If you have frozen them just pop them in the microwave to reheat and they will be fine.

The Verdict

As mentioned, these scones disappear quickly and there are usually none leftover to freeze. We eat them with whipped cream and jam.